 |
|
 |
- View Your Aliases
- Add an Alias
- Delete an Alias
Use this menu item on the User - Messaging menu page to
The Shared Call Appearance service allows you to view your alternate locations. Alternate locations are alerted along with the primary location when an incoming call is received. Any one of these locations can answer the incoming call. The location that answers the call becomes the active locationThe Aliases service allows you to access your voice mailbox from other phones as if you were at your primary phone.
View Your Aliases
Use this procedure to view the other phone numbers from which you can access your voice mailbox as if you were at your office phone (for example, your cell phone).

- On the User - Messaging menu page click Aliases. The User - Aliases page displays, showing your aliases.
- To display the previous page, click OK or Cancel. The User - Messaging menu page displays.
Add an Alias
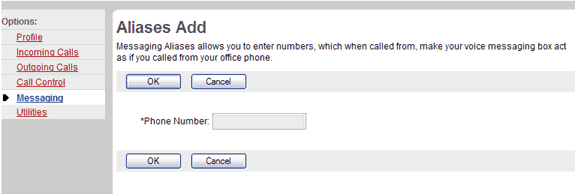
Use this procedure to add a phone number from which you can access your voice mailbox as if you were at your office phone (for example, your cell phone).

- On the User - Messaging menu page click Aliases. The User - Aliases page displays, showing your aliases.
- Click Add. The User - Aliases Add page displays.
- Type the alias phone number in the Phone Number text box.
- To save your changes and display the previous page, click OK.
To exit without saving, select another page or click Cancel to display the previous page. - In the User - Aliases page, save your changes. Click Apply or OK. Apply saves your changes. OK saves your changes and displays the previous page.
Delete an Alias
Use this procedure to delete an alias.

- On the User - Messaging menu page click Aliases. The User - Aliases page displays, showing your aliases.
- Check the Delete box next to the entry to delete.
- Save your changes. Click Apply or OK. Apply saves your changes. OK saves your changes and displays the previous page.
To exit without saving, select another page or click Cancel to display the previous page.WARNING: This action cannot be undone. Once you click Apply or OK, the entry is permanently deleted.
|
Best viewed with IE 5.0 and Netscape 6.0 & above. © SingTel All Rights Reserved.
|